기억력 향상 게임
준비물
| NO | 부품명 | 수량 |
| 1 | 아두이노 UNO R3 | 1 |
| 2 | LCD모듈 | 1 |
| 3 | LED | 4 |
| 5 | 저항(100옴) | 4 |
| 6 | 푸쉬버튼스위치(노브) | 4 |
| 7 | 부저 | 1 |
| 8 | 점퍼케이블 | 25 |
| 9 | 9V 전원(케이블) | 1 |
| 10 | 브레드보드 | 1 |
회로도

코드
LCD 라이브러리를 라이브러리 매니저에서 추가해줍니다.
#include "LiquidCrystal_I2C.h"
LiquidCrystal_I2C lcd(0x27,16,2);

int buttons[4] = {2, 3, 4,  5};
int leds[4]    = {8, 9, 10, 11};

boolean button[4] = {0, 0, 0, 0};

#define buzzer 6

#define levelsInGame 50

//create an array for this game
int bt_simonSaid[100]; //initialise the array
int led_simonSaid[100]; //initialise the array

boolean lost;
int game_play, level, stage;

void setup(){ // the setup function runs once when you press reset or power the board
Serial.begin(9600);

// initialize digital pins as outputs for LEDS in the buttons.
for(int i=0; i<=3; i++) {
pinMode(buttons[i], INPUT_PULLUP);// set the button pins as inputs
pinMode(leds[i], OUTPUT); // set the led pins as outputs
}

pinMode(buzzer, OUTPUT);

lcd.init();// initialize the lcd
lcd.backlight();
lcd.setCursor(0,0);
lcd.print("   Welcome To   ");
lcd.setCursor(0,1);
lcd.print("> Memory  Game <");
delay(2000); // Waiting for a while
lcd.clear();

randomSeed(analogRead(0));  //make our random numbers more random
}


void loop() {// the loop function runs over and over again forever

switch(stage){
case 0:
      lcd.setCursor(0, 0); lcd.print("Press Red Button");
      lcd.setCursor(0, 1); lcd.print(" for Start Game ");
      button[0] = digitalRead(buttons[0]);
      while(button[0] == HIGH) {
        button[0] = digitalRead(buttons[0]);
      }
      level=1, stage=1, game_play=1;
break;

case 1:
      lcd.clear();
      //print level on screen
      lcd.setCursor(4,0);
      lcd.print("Level: ");
      lcd.print((level/10)%10);
      lcd.print(level%10);

      lcd.setCursor(0,1);
      lcd.print(" -- Memorize -- ");
      delay(1500);
      led_simonSaid[level] = random(8, 12); // populate the array with random 'colours'
      for(int i=1; i<=level; i++) {
        digitalWrite(led_simonSaid[i], HIGH);//turn on the button light
        playBuzzer(led_simonSaid[i]-7);
        digitalWrite(led_simonSaid[i], LOW);
        delay(400);
      }
      delay(500);
      stage=2;
break;

case 2:
      stage=3;
      lcd.setCursor(0, 1);
      lcd.print("   -- Play --   ");
break;

case 3:
     for(int i=0; i<=3; i++){
        button[i] = digitalRead(buttons[i]);
        if(button[i] == LOW){
          bt_simonSaid[game_play] = leds[i];
          digitalWrite(leds[i], HIGH);
          playBuzzer(i+1); //make the sound of the button pressed - right or wrong
          while(button[i] == LOW){
            button[i] = digitalRead(buttons[i]);
          }
          delay(50);
          digitalWrite(leds[i], LOW);
          game_play++;
          if(game_play-1==level){game_play=1;
            stage=4;
            break;
          }
        }
      }
      delay(10);
break;

case 4:
     lcd.setCursor(0, 1);
     lcd.print("  Verification  ");
     delay(1000);
     for(int i=1; i<=level; i++){
        if(led_simonSaid[i]!=bt_simonSaid[i]){
          lost=1;
          break;
        }
      }
      if(lost==1)stage=5;
            else stage=6;
break;

case 5:
      lcd.setCursor(0, 1);
      lcd.print(" !! You Lost !! ");
      tone(buzzer, 350); //play game over low tone on buzzer
      for(int i=0; i<=3; i++) {
      digitalWrite(leds[i], HIGH);
      }
      delay(1000);
      lcd.setCursor(0, 1);
      lcd.print("!! GAME  OVER !!");
      noTone(buzzer);
      delay(1000);
      for(int i=0; i<=3; i++) {
      digitalWrite(leds[i], LOW);
      }
      level=1, stage=0, lost=0;
 break;

case 6:
      lcd.setCursor(0, 1);
      lcd.print(" ** You  Win ** ");
      delay(1000);
    if(level==levelsInGame){
      lcd.setCursor(0, 0);
      lcd.print("Congratulation");
      lcd.setCursor(0, 1);
      lcd.print(" Level Complete");
      delay(1000);
      lcd.clear();
      level=1;
      }else{
      if(level<levelsInGame)level++;
      }

      stage=1;
break;

default:
break;
}

}

void playBuzzer(int x) {
tone(buzzer, 650+(x*100));
delay(300);
noTone(buzzer);
}
거짓말 탐지기
GSR(Galvanic Skin Response)는 피부의 전도성 변화를 측정하여 스트레스 또는 감정 변화를 감지하는 데 사용되는 생리학적인 센서입니다. 이 센서는 피부의 땀 분비에 의한 전도성 변화를 감지하여 심리적 및 감정적 반응을 측정합니다.
GSR 센서는 전기 전도도를 측정하는 두 개의 전극으로 구성됩니다. 이 두 전극은 피부와 접촉하여 피부의 전기 전도도를 측정합니다. 피부의 전기 전도도는 피부 상태와 땀 분비량에 따라 변화합니다. 스트레스, 감정적인 긴장, 불안, 혹은 사실을 숨기려는 시도 등으로 인해 신체가 긴장되면, 자동적으로 땀 분비가 증가하게 됩니다. 이에 따라 피부의 전기 전도도가 증가하게 되고, 이러한 변화를 GSR 센서가 감지합니다.
따라서 GSR 센서는 주로 거짓말 탐지 및 감정 인식 분야에서 사용됩니다. 사람이 거짓말을 할 때나 감정적으로 긴장할 때, 피부의 전기 전도도가 증가하므로 이러한 변화를 감지하여 거짓말을 탐지하거나 감정을 분석하는 데 사용될 수 있습니다.
아래는 공식 홈페이지
https://wiki.seeedstudio.com/Grove-GSR_Sensor/
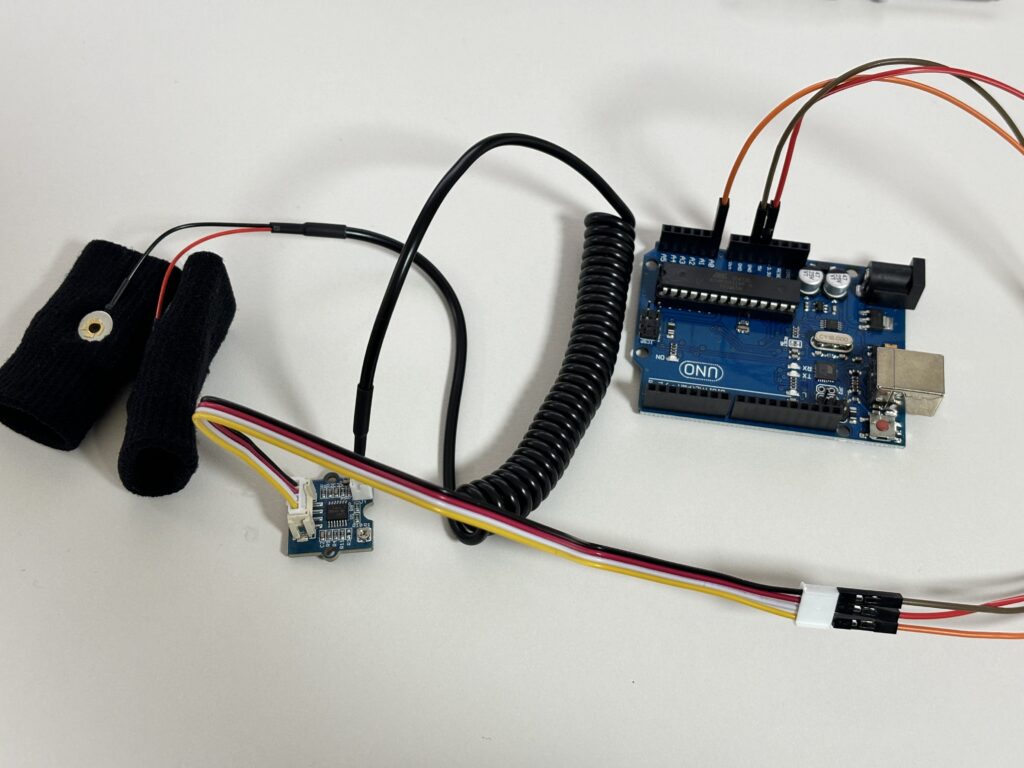
검은색 : GND, 빨간색 : VCC, 노란색 : A0, 흰색 : 연결X
예제 코드
const int GSR=A0;
int sensorValue=0;
int gsr_average=0;

void setup(){
  Serial.begin(9600);
}

void loop(){
  long sum=0;
  for(int i=0;i<10;i++)           //Average the 10 measurements to remove the glitch
      {
      sensorValue=analogRead(GSR);
      sum += sensorValue;
      delay(5);
      }
   gsr_average = sum/10;
   Serial.println(gsr_average);
}
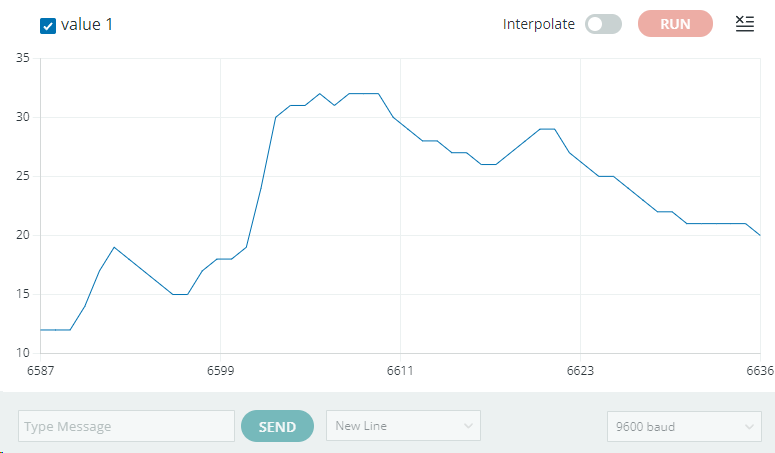
아래와 같이 시리얼 모니터에 그래프가 그려지는것을 확인할 수 있습니다.