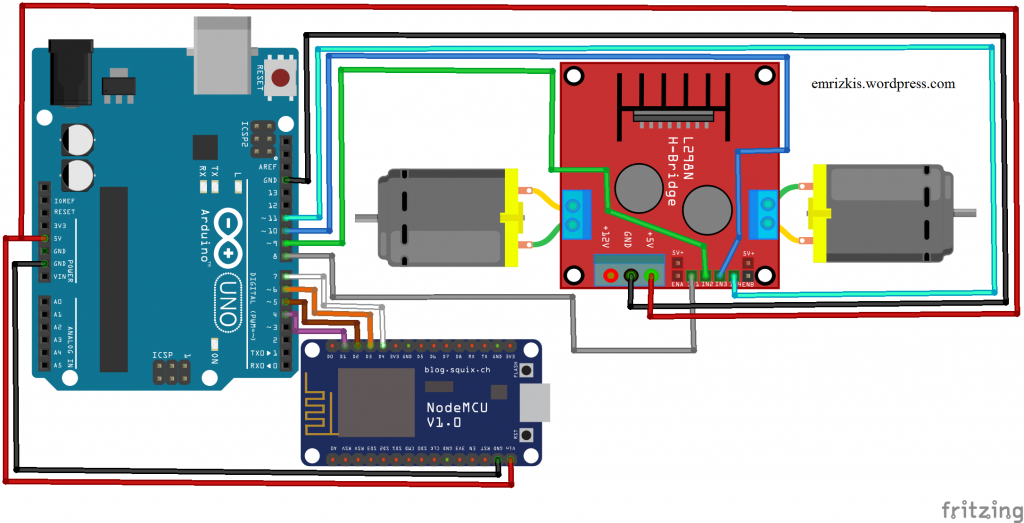
이번 시간에는 Blynk로 이전에 만들었던 라인트레이서(에서 적외선 센서만 제거한 뒤)를 움직여보도록 하겠다. RC카는 Remote Control Car 의 줄임말인데, 원격조종자동차라고 생각하면 된다.
회로도

Arduino 코드
코드 보기const int forward = 4;
const int back = 5;
const int right = 6;
const int left = 7;
int forward, back, right, left = 0;
void setup()
{
pinMode(8, OUTPUT);
pinMode(9, OUTPUT);
pinMode(10, OUTPUT);
pinMode(11, OUTPUT);
pinMode(forward, INPUT);
pinMode(back, INPUT);
pinMode(right, INPUT);
pinMode(left, INPUT);
}
void loop()
{
val1 = digitalRead(foward); // 직진
val2 = digitalRead(back); // 후진
val3 = digitalRead(right); // 우회전
val4 = digitalRead(left); // 좌회전
// 직진
if (val1 == HIGH && val2 == LOW && val == LOW && val == LOW)
{
digitalWrite(8, HIGH);
digitalWrite(9, LOW);
digitalWrite(10, HIGH);
digitalWrite(11, LOW);
}
// 후진
if (val1 == LOW && val2 == HIGH && val3 == LOW && val4 == LOW)
{
digitalWrite(8, LOW);
digitalWrite(9, HIGH);
digitalWrite(10, LOW);
digitalWrite(11, HIGH);
}
// 우회전
if (val1 == LOW && val2 == LOW && val3 == HIGH && val4 == LOW)
{
digitalWrite(8, HIGH);
digitalWrite(9, LOW);
digitalWrite(10, LOW);
digitalWrite(11, LOW);
}
// 좌회전
if (val1 == LOW && val2 == LOW && val3 == LOW && val4 == HIGH)
{
digitalWrite(8, LOW);
digitalWrite(9, LOW);
digitalWrite(10, HIGH);
digitalWrite(11, LOW);
}
if (val1 == LOW && val == LOW && val == LOW && val == LOW)
{
digitalWrite(8, LOW);
digitalWrite(9, LOW);
digitalWrite(10, LOW);
digitalWrite(11, LOW);
}
}
NodeMCU 코드
코드 보기/*************************************************************
Download latest Blynk library here:
https://github.com/blynkkk/blynk-library/releases/latest
Blynk is a platform with iOS and Android apps to control
Arduino, Raspberry Pi and the likes over the Internet.
You can easily build graphic interfaces for all your
projects by simply dragging and dropping widgets.
Downloads, docs, tutorials: http://www.blynk.cc
Sketch generator: http://examples.blynk.cc
Blynk community: http://community.blynk.cc
Follow us: http://www.fb.com/blynkapp
http://twitter.com/blynk_app
Blynk library is licensed under MIT license
This example code is in public domain.
*************************************************************
This example runs directly on NodeMCU.
Note: This requires ESP8266 support package:
https://github.com/esp8266/Arduino
Please be sure to select the right NodeMCU module
in the Tools -> Board menu!
For advanced settings please follow ESP examples :
- ESP8266_Standalone_Manual_IP.ino
- ESP8266_Standalone_SmartConfig.ino
- ESP8266_Standalone_SSL.ino
Change WiFi ssid, pass, and Blynk auth token to run :)
Feel free to apply it to any other example. It's simple!
*************************************************************/
/* Comment this out to disable prints and save space */
#define BLYNK_PRINT Serial
#include <ESP8266WiFi.h>
#include <BlynkSimpleEsp8266.h>
// You should get Auth Token in the Blynk App.
// Go to the Project Settings (nut icon).
char auth[] = "YourAuthToken"; // Token 입력
// Your WiFi credentials.
// Set password to "" for open networks.
char ssid[] = "YourNetworkName"; // Wifi 이름 입력
char pass[] = "YourPassword"; // Wifi 비밀번호 입력
void setup()
{
// Debug console
Serial.begin(9600);
Blynk.begin(auth, ssid, pass);
}
void loop()
{
Blynk.run();
}
Blynk App 설정
Blynk App에서는 다음과 같이 Button을 네 개 만들어주고 NodeMCU에 연결된 선이 D3, D2, D1, D0가 차례대로 Arduino 코드에서 전진, 후진, 우회전, 좌회전이므로 그에 맞게 pin을 설정해준다.

그리고 실행 버튼을 눌러 RC카를 원격으로 조종해보자!
