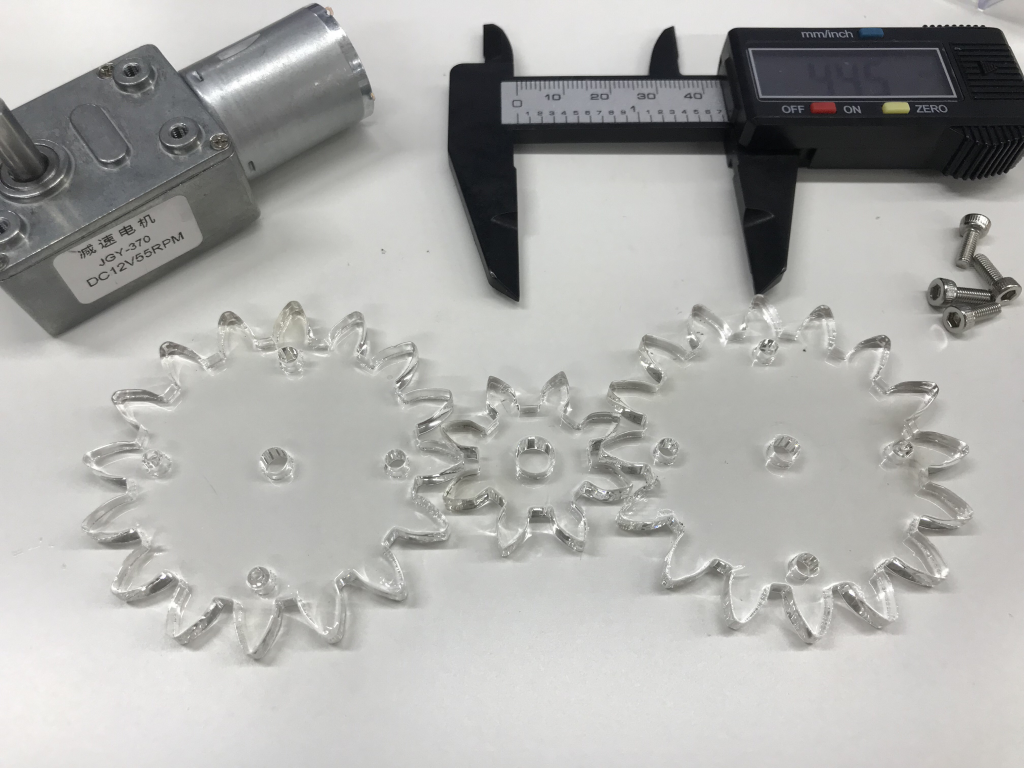
The reason I do not use an existing gear is because I have to drill a hole in the gear, so I design it directly for customization.
gear online generator : https://geargenerator.com/#200,200,100,6,1,0,0,4,1,8,2,4,27,-90,0,0,16,4,4,27,-60,1,1,12,1,12,20,-60,2,0,60,5,12,20,0,0,0,2,-563
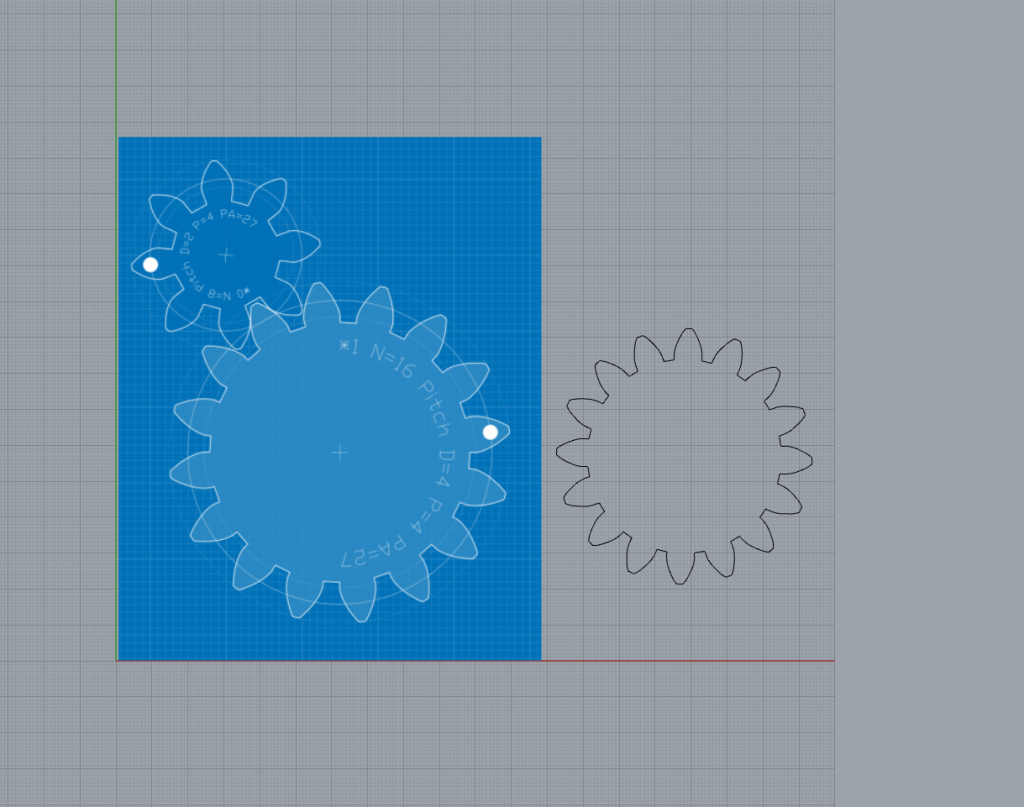
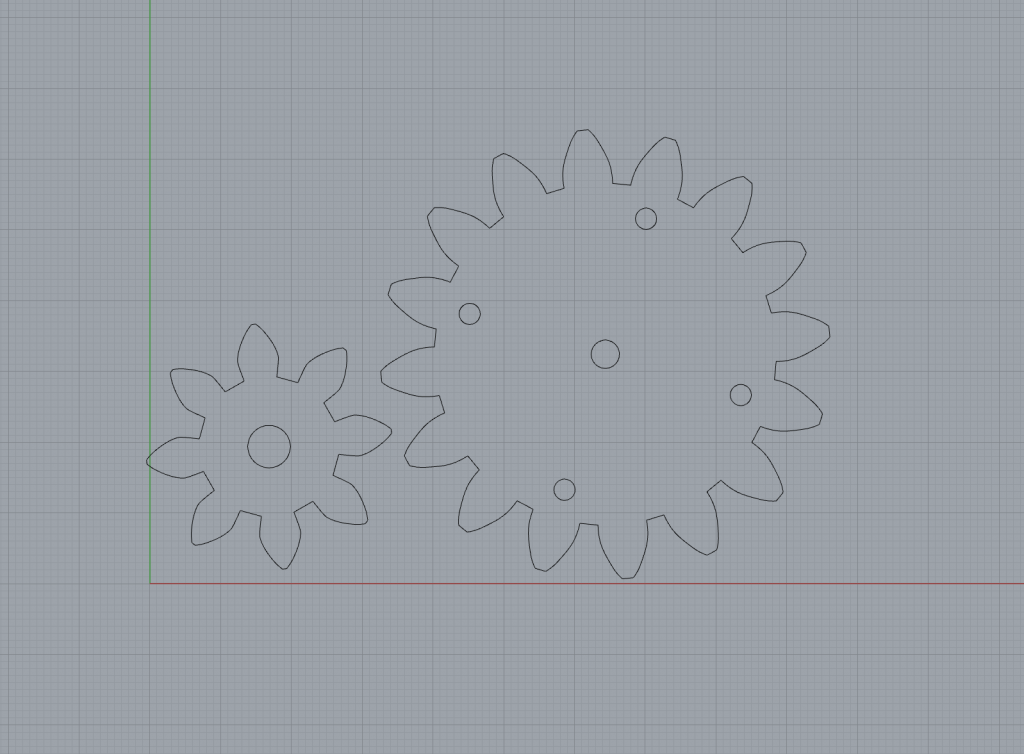
Rhino Design Process(ArrayPollar)
Loading Rhino Render, version 1.50, May  7 2019, 17:32:43
Command: -_New
Name of the Rhino template file to open ( None  Browse ): "C:\Users\cdt\AppData\Roaming\McNeel\Rhinoceros\6.0\Localization\en-US\Template Files\Large Objects - Millimeters.3dm"
Command: Picture
First corner of picture ( 3Point  Vertical  Center  AroundCurve  1to1 ): 0
Other corner or length ( 3Point )
Creating meshes... Press Esc to cancel
Command: _Circle
Center of circle ( Deformable  Vertical  2Point  3Point  Tangent  AroundCurve  FitPoints )
Diameter <10.00> ( Radius  Orientation  Circumference  Area  ProjectOsnap=Yes )
Command: _Circle
Center of circle ( Deformable  Vertical  2Point  3Point  Tangent  AroundCurve  FitPoints )
Diameter <54.01> ( Radius  Orientation  Circumference  Area  ProjectOsnap=Yes )
Command: _Point
Location of point object
Command: _Circle
Center of circle ( Deformable  Vertical  2Point  3Point  Tangent  AroundCurve  FitPoints )
Diameter <54.01> ( Radius  Orientation  Circumference  Area  ProjectOsnap=Yes )
1 curve added to selection.
Command: Divide
Drag seam point to adjust. Press Enter when done ( Flip  Automatic  Natural ): 16
Unknown command: 16
Drag seam point to adjust. Press Enter when done ( Flip  Automatic  Natural )
Number of segments <1> ( Length  Split=No  MarkEnds=Yes  GroupOutput=No ): 16
1 curve added to selection.
Command: Divide
Drag seam point to adjust. Press Enter when done ( Flip  Automatic  Natural )
Command: Divide
Drag seam point to adjust. Press Enter when done ( Flip  Automatic  Natural )
Number of segments <16> ( Length  Split=No  MarkEnds=Yes  GroupOutput=No )
Command: _Polyline
Start of polyline ( PersistentClose=No )
Next point of polyline ( PersistentClose=No  Mode=Line  Helpers=No  Undo )
Next point of polyline ( PersistentClose=No  Mode=Line  Helpers=No  Undo )
Command: _Polyline
Start of polyline ( PersistentClose=No )
Next point of polyline ( PersistentClose=No  Mode=Line  Helpers=No  Undo )
Next point of polyline. Press Enter when done ( PersistentClose=No  Mode=Line  Helpers=No  Length  Undo )
Command: _Curve
Start of curve ( Degree=3  PersistentClose=No )
Next point ( Degree=3  PersistentClose=No  Undo )
Command: _InterpCrv
Start of curve ( Degree=3  Knots=Chord  PersistentClose=No  StartTangent )
Next point ( Degree=3  Knots=Chord  PersistentClose=No  EndTangent  Undo )
Next point. Press Enter when done ( Degree=3  Knots=Chord  PersistentClose=No  EndTangent  Undo )
Next point. Press Enter when done ( Degree=3  Knots=Chord  PersistentClose=No  EndTangent  Close  Sharp=No  Undo )
Next point. Press Enter when done ( Degree=3  Knots=Chord  PersistentClose=No  EndTangent  Close  Sharp=No  Undo )
Next point. Press Enter when done ( Degree=3  Knots=Chord  PersistentClose=No  EndTangent  Close  Sharp=No  Undo )
Next point. Press Enter when done ( Degree=3  Knots=Chord  PersistentClose=No  EndTangent  Close  Sharp=No  Undo )
1 surface added to selection.
1 curve added to selection.
Command: Mirror
Start of mirror plane ( 3Point  Copy=Yes  XAxis  YAxis )
End of mirror plane ( Copy=Yes )
Command: Mirror
Start of mirror plane ( 3Point  Copy=Yes  XAxis  YAxis )
Command: Trimi
Unknown command: Trimi
1 surface added to selection.
Drag objects, tap Alt to make a duplicate
Command: _Undo
Undoing Drag
Command: Trim
Select object to trim, select pressing Shift to extend. Press Enter to clear selection and start over ( ExtendCuttingLines=No  ApparentIntersections=Yes )
Splitting... Press Esc to cancel
Select object to trim, select pressing Shift to extend. Press Enter when done ( ExtendCuttingLines=No  ApparentIntersections=Yes  Undo )
Select object to trim, select pressing Shift to extend. Press Enter when done ( ExtendCuttingLines=No  ApparentIntersections=Yes  Undo )
Command: Trim
Select object to trim, select pressing Shift to extend. Press Enter to clear selection and start over ( ExtendCuttingLines=No  ApparentIntersections=Yes )
Select object to trim, select pressing Shift to extend. Press Enter when done ( ExtendCuttingLines=No  ApparentIntersections=Yes  Undo )
Select object to trim, select pressing Shift to extend. Press Enter when done ( ExtendCuttingLines=No  ApparentIntersections=Yes  Undo )
Command: Trim
Select cutting objects ( ExtendCuttingLines=No  ApparentIntersections=Yes  Line ): selcrv
5 curves added to selection.
Select cutting objects. Press Enter when done ( ExtendCuttingLines=No  ApparentIntersections=Yes  Line )
Select object to trim, select pressing Shift to extend ( ExtendCuttingLines=No  ApparentIntersections=Yes )
Select object to trim, select pressing Shift to extend. Press Enter when done ( ExtendCuttingLines=No  ApparentIntersections=Yes  Undo )
Select object to trim, select pressing Shift to extend. Press Enter when done ( ExtendCuttingLines=No  ApparentIntersections=Yes  Undo )
Select object to trim, select pressing Shift to extend. Press Enter when done ( ExtendCuttingLines=No  ApparentIntersections=Yes  Undo )
Select object to trim, select pressing Shift to extend. Press Enter when done ( ExtendCuttingLines=No  ApparentIntersections=Yes  Undo ): _Undo
Select object to trim, select pressing Shift to extend. Press Enter when done ( ExtendCuttingLines=No  ApparentIntersections=Yes  Undo )
Splitting... Press Esc to cancel
Creating meshes... Press Esc to cancel
Select object to trim, select pressing Shift to extend. Press Enter when done ( ExtendCuttingLines=No  ApparentIntersections=Yes  Undo ): _Undo
Select object to trim, select pressing Shift to extend. Press Enter when done ( ExtendCuttingLines=No  ApparentIntersections=Yes  Undo )
Select object to trim, select pressing Shift to extend. Press Enter when done ( ExtendCuttingLines=No  ApparentIntersections=Yes  Undo )
Select object to trim, select pressing Shift to extend. Press Enter when done ( ExtendCuttingLines=No  ApparentIntersections=Yes  Undo )
Select object to trim, select pressing Shift to extend. Press Enter when done ( ExtendCuttingLines=No  ApparentIntersections=Yes  Undo )
1 curve added to selection.
Command: _Delete
1 curve added to selection.
1 curve added to selection.
1 curve added to selection.
Command: ArraySrf
Base point for objects to array
Command: _Polyline
Start of polyline ( PersistentClose=No )
Next point of polyline ( PersistentClose=No  Mode=Line  Helpers=No  Undo )
Next point of polyline. Press Enter when done ( PersistentClose=No  Mode=Line  Helpers=No  Length  Undo )
Command: Divide
Select curves to divide
Select curves to divide. Press Enter when done
Number of segments <16> ( Length  Split=No  MarkEnds=Yes  GroupOutput=No ): 2
1 curve added to selection.
Command: Split
Select cutting objects ( Point )
Select cutting objects. Press Enter when done ( Point )
Select cutting objects. Press Enter when done ( Point )
One curve split into 2 pieces.
1 curve added to selection.
Command: _Delete
1 curve added to selection.
1 surface added to selection.
Command: Hide
1 curve added to selection.
1 curve added to selection.
1 curve added to selection.
1 curve added to selection.
1 curve added to selection.
1 curve point added to selection.
Press and hold Alt to temporarily toggle osnaps, tap Alt to make a duplicate
1 curve point added to selection.
Press and hold Alt to temporarily toggle osnaps, tap Alt to make a duplicate
1 curve added to selection.
Command: _Delete
1 curve added to selection.
Command: Mirror
Start of mirror plane ( 3Point  Copy=Yes  XAxis  YAxis )
End of mirror plane ( Copy=Yes )
1 curve added to selection.
1 curve added to selection.
1 curve added to selection.
1 curve added to selection.
Command: ArrayPolar
Center of polar array ( Axis )
Number of items <3>: 16
Angle to fill or first reference point <360> ( Preview=Yes  StepAngle  Rotate=Yes  ZOffset=0 )
Press Enter to accept. FillAngle = 360 ( Items=16  FillAngle  Rotate=Yes  ZOffset=0 )
Command: ArrayPolar
Select objects to array
1 curve added to selection.
1 curve added to selection.
1 curve added to selection.
1 curve added to selection.
Command: ArrayPolar
Center of polar array ( Axis )
Angle to fill or first reference point <360> ( Preview=Yes  StepAngle  Rotate=Yes  ZOffset=0 )
Press Enter to accept. FillAngle = 360 ( Items=16  FillAngle  Rotate=Yes  ZOffset=0 )
1 curve added to selection.
Command: _Delete
Command: _Polyline
Start of polyline ( PersistentClose=No )
Next point of polyline ( PersistentClose=No  Mode=Line  Helpers=No  Undo )
Next point of polyline. Press Enter when done ( PersistentClose=No  Mode=Line  Helpers=No  Length  Undo )
1 curve added to selection.
1 curve added to selection.
Command: _Delete
1 curve added to selection.
1 curve added to selection.
1 curve added to selection.
Command: _Delete
1 curve added to selection.
Command: _Delete
1 curve added to selection.
Command: _Delete
1 curve added to selection.
Command: _Delete
1 curve added to selection.
Command: _Delete
1 curve added to selection.
Command: _Delete
1 curve added to selection.
Command: _Delete
1 curve added to selection.
Command: _Delete
1 curve added to selection.
Command: _Delete
1 curve added to selection.
Command: _Delete
1 curve added to selection.
Command: _Delete
1 curve added to selection.
Command: _Delete
1 curve added to selection.
Command: _Delete
1 curve added to selection.
Command: _Delete
1 curve added to selection.
Command: ArrayPolar
Center of polar array ( Axis )
Number of items <16>: 16
Angle to fill or first reference point <360> ( Preview=Yes  StepAngle  Rotate=Yes  ZOffset=0 ): 360
Press Enter to accept. FillAngle = 360 ( Items=16  FillAngle  Rotate=Yes  ZOffset=0 )
1 point added to selection.
Command: SelPt
36 points added to selection.
Command: _Delete
1 curve added to selection.
Command: _Delete
Command: SelCrv
64 curves added to selection.
Command: Join
Joining curves.
64 curves joined into one closed curve.
2019 06 13 modified gear sketch files on Rhino