이번엔, Blynk를 이용하여 초음파센서 값을 휴대폰으로 받아볼 수 있도록 해보자.
우선, 아래와 같이 초음파센서와 NodeMCU를 연결해준다.

Trig pin은 D1 pin에, Echo pin은 D2 pin에다가 연결해주고, GND는 GND에 연결해준다. 그림 상에서 VCC는 3.3V pin에 연결되어 있지만 사실 5V에서 작동하는 초음파 센서이므로, 아두이노 UNO보드를 건전지 연결해준 상태에서 전원선 5V만 뽑아서 초음파센서의 VCC에 연결을 해준다.
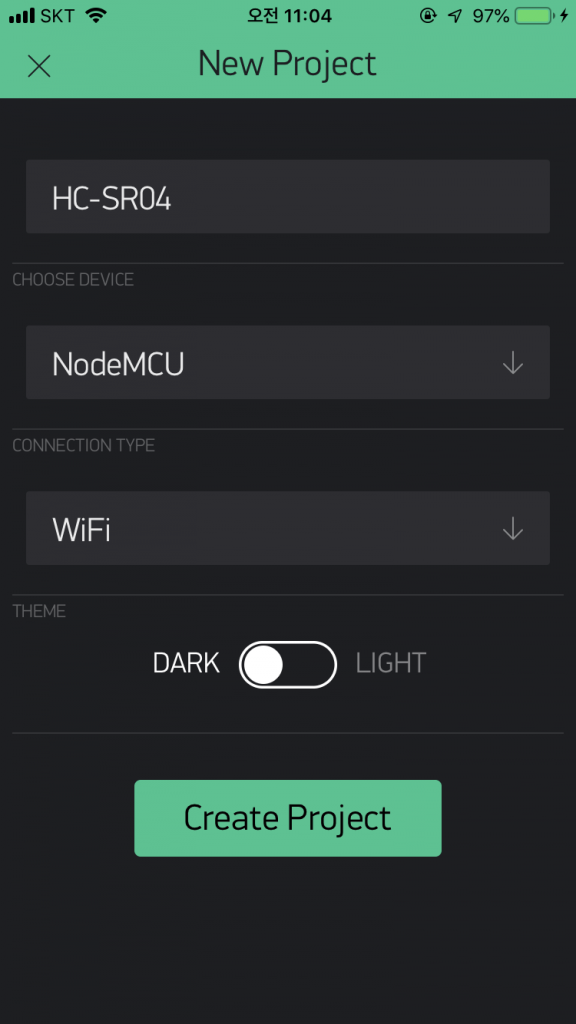
그 다음에, Blynk App에 들어가서 New Project를 눌러 새 프로젝트를 생성해준 뒤, 다음과 같이 설정해 준다.
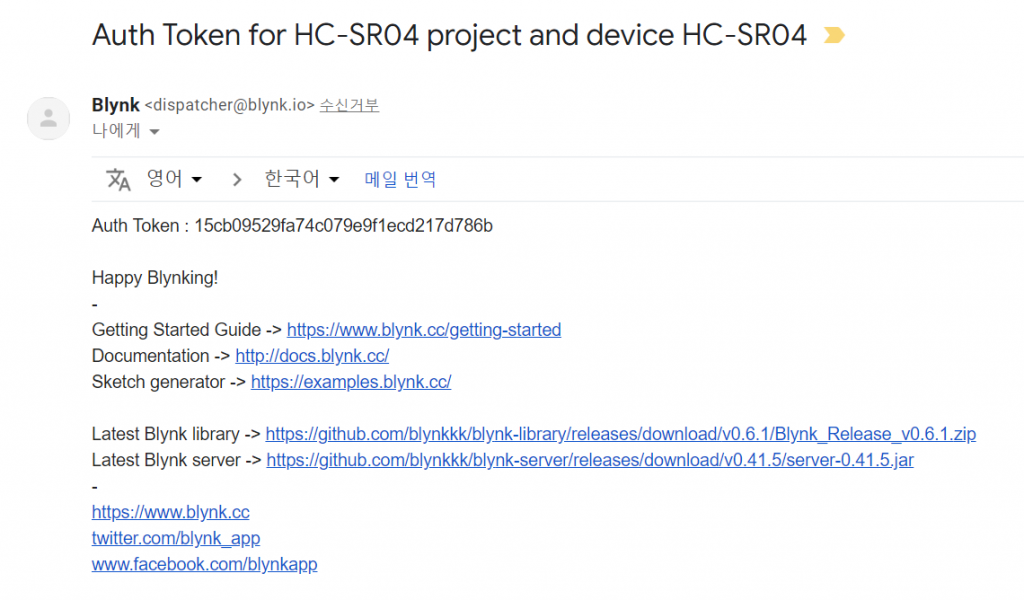
그러면 토큰이 자동으로 메일로 전송되는데, 전송되지 않는 경우 토큰을 메일로 보내기 눌러서 메일로 보내준다.
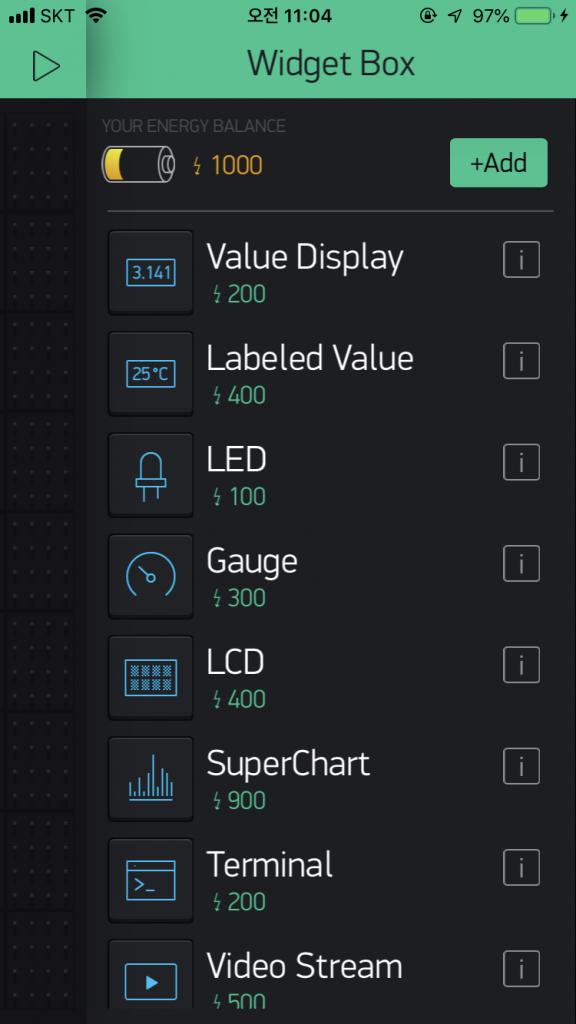
새 프로젝트에 들어가서는 위젯을 누르고 LCD를 선택한다.
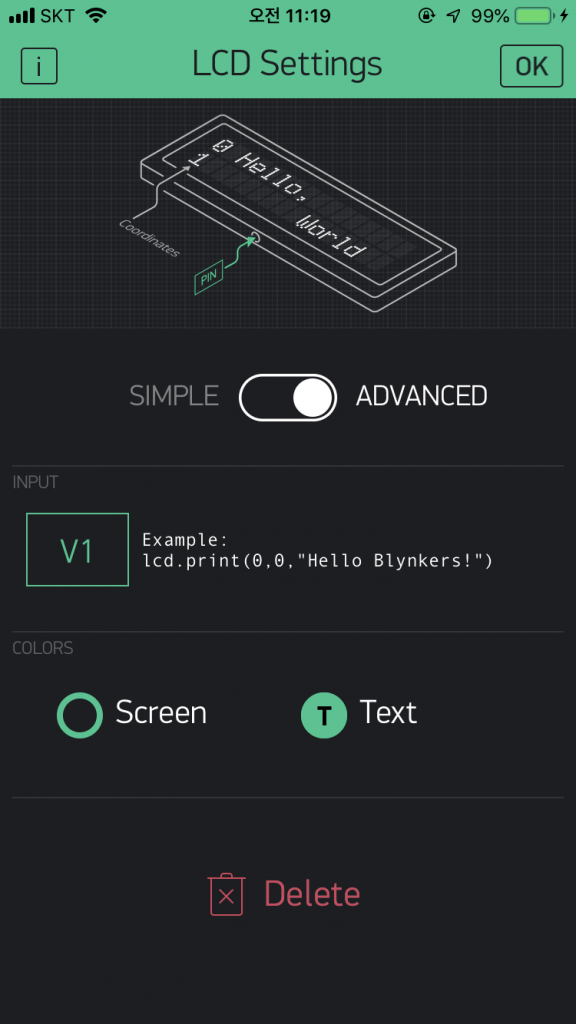
LCD를 눌러 setting을 다음과 같이 해준다. INPUT을 V1 pin으로 해준다.
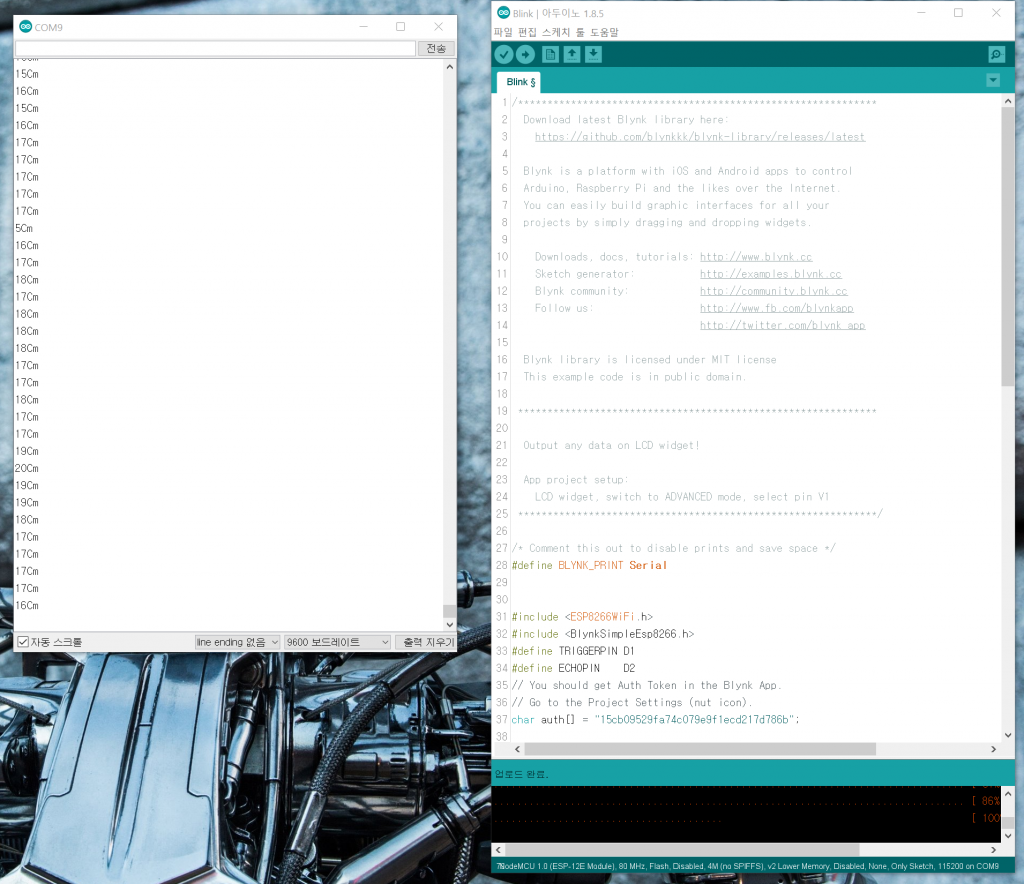
그 다음으로는, NodeMCU와 컴퓨터를 USB로 연결 한 뒤, 아래와 같은 코드를 업로드 해 준다.
/*************************************************************
  Download latest Blynk library here:
    https://github.com/blynkkk/blynk-library/releases/latest

  Blynk is a platform with iOS and Android apps to control
  Arduino, Raspberry Pi and the likes over the Internet.
  You can easily build graphic interfaces for all your
  projects by simply dragging and dropping widgets.

    Downloads, docs, tutorials: http://www.blynk.cc
    Sketch generator:           http://examples.blynk.cc
    Blynk community:            http://community.blynk.cc
    Follow us:                  http://www.fb.com/blynkapp
                                Tweets by blynk_app

  Blynk library is licensed under MIT license
  This example code is in public domain.

 *************************************************************

  Output any data on LCD widget!

  App project setup:
    LCD widget, switch to ADVANCED mode, select pin V1
 *************************************************************/

/* Comment this out to disable prints and save space */
#define BLYNK_PRINT Serial


#include <ESP8266WiFi.h>
#include <BlynkSimpleEsp8266.h>
#define TRIGGERPIN D1
#define ECHOPIN    D2
// You should get Auth Token in the Blynk App.
// Go to the Project Settings (nut icon).
char auth[] = "Your auth token";

// Your WiFi credentials.
// Set password to "" for open networks.
char ssid[] = "your wifi SSID";
char pass[] = "your password";

WidgetLCD lcd(V1);

void setup()
{
  // Debug console
  Serial.begin(9600);
pinMode(TRIGGERPIN, OUTPUT);
  pinMode(ECHOPIN, INPUT);
  Blynk.begin(auth, ssid, pass);
  // You can also specify server:
  //Blynk.begin(auth, ssid, pass, "blynk-cloud.com", 8442);
  //Blynk.begin(auth, ssid, pass, IPAddress(192,168,1,100), 8442);

  lcd.clear(); //Use it to clear the LCD Widget
  lcd.print(0, 0, "Distance in cm"); // use: (position X: 0-15, position Y: 0-1, "Message you want to print")
  // Please use timed events when LCD printintg in void loop to avoid sending too many commands
  // It will cause a FLOOD Error, and connection will be dropped
}

void loop()
{
  lcd.clear();
  lcd.print(0, 0, "Distance in cm"); // use: (position X: 0-15, position Y: 0-1, "Message you want to print")
  long duration, distance;
  digitalWrite(TRIGGERPIN, LOW);
  delayMicroseconds(3);

  digitalWrite(TRIGGERPIN, HIGH);
  delayMicroseconds(12);

  digitalWrite(TRIGGERPIN, LOW);
  duration = pulseIn(ECHOPIN, HIGH);
  distance = (duration/2) / 29.1;
  Serial.print(distance);
  Serial.println("Cm");
  lcd.print(7, 1, distance);
  Blynk.run();

  delay(10);

}
위의 코드에서,
char auth[] = "Your auth token";

// Your WiFi credentials.
// Set password to "" for open networks.
char ssid[] = "your wifi SSID";
char pass[] = "your password";
이 부분에 메일로 보내진 토큰을 적고, 와이파이 이름, 비밀번호를 입력하고 NodeMCU보드가 포트에 잘 연결되어있는지 확인하고 업로드를 해준다. 업로드가 완료되면 다시 Blynk앱으로 돌아가서 삼각형(실행버튼)을 눌러준다. 그러면 아래와 같이 거리가 화면에 나오는 것을 확인할 수 있다.

NodeMCU가 컴퓨터랑 연결되어있는 상태에서 시리얼 모니터를 확인하면, 아래와 같이 시리얼모니터에서도 초음파센서의 센서값을 확인할 수 있다.
Wanted to drop a comment and let you know your Feed is not working today. I tried including it to my Bing reader account and got absolutely nothing.