
Until last time, I created a project in the Google Console and downloaded the OAuth 2.0 security token. Today is the last time! This time, we will install the Google SDK and run the sample code on Raspberry Pi.
Configure a new Python virtual environment
Enter the following at the Raspberry Pi terminal.
$ sudo apt-get update
$ sudo apt-get install python3-dev python3-venv
$ python3 -m venv env
$ env/bin/python -m pip install --upgrade pip setuptools wheel
$ source env/bin/activate
Get the package
The Google Assistant SDK package contains all the code required to get the Google Assistant running on the device, including the sample code.
Install the package’s system dependencies:
(env) $ sudo apt-get install portaudio19-dev libffi-dev libssl-dev libmpg123-dev
# Use pip to install the latest version of the Python package in the virtual environment:
(env) $ python -m pip install --upgrade google-assistant-library==1.0.1
(env) $ python -m pip install --upgrade google-assistant-sdk[samples]==0.5.1
Generate credentials
Install or update the authorization tool:
(env) $ python -m pip install --upgrade google-auth-oauthlib[tool]
Generate credentials to be able to run the sample code and tools. Reference the JSON file you downloaded in a previous step; you may need to copy it the device. Do not rename this file.
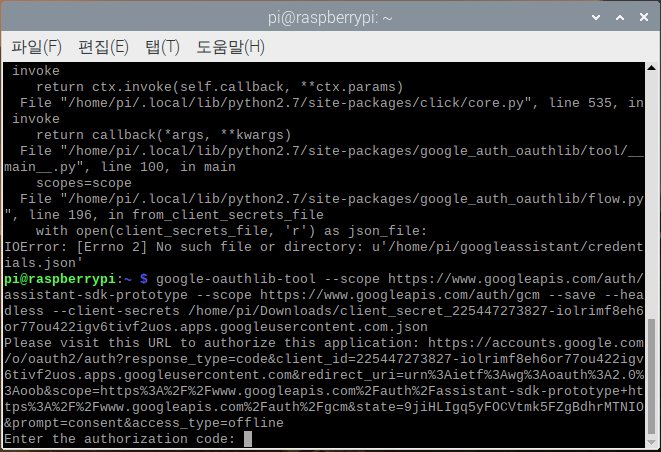
(env) $ google-oauthlib-tool --scope https://www.googleapis.com/auth/assistant-sdk-prototype --scope https://www.googleapis.com/auth/gcm --save --headless --client-secrets /home/pi/Downloads/[your client oauth file name].json
You should see a URL displayed in the terminal:
Please visit this URL to authorize this application: https://...
Copy the URL and paste it into a browser (this can be done on any machine). The page will ask you to sign in to your Google account. Sign into the Google account that created the developer project in the previous
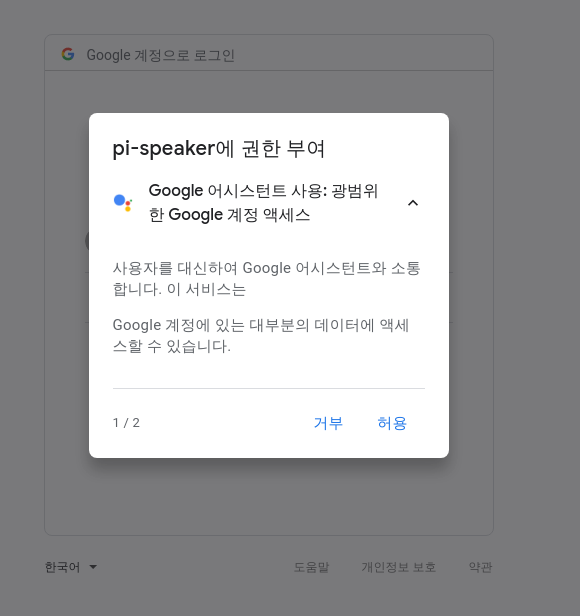
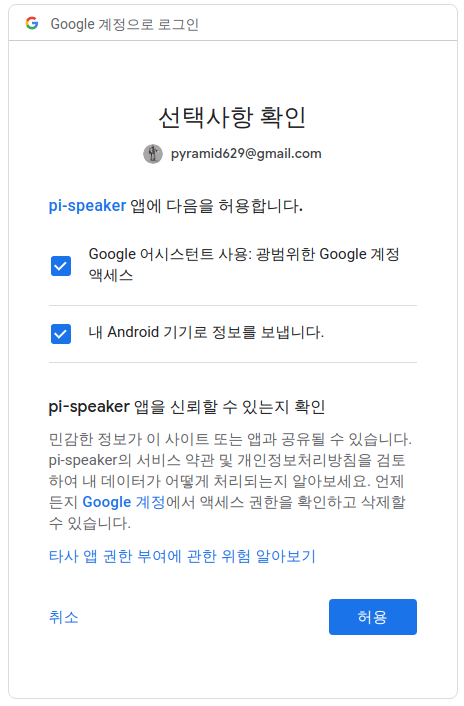
After you approve the permission request from the API, a code will appear in your browser, such as “4/XXXX”. Copy and paste this code into the terminal:
Enter the authorization code:
If authorization was successful, you will see a response similar to the following:
credentials saved: /path/to/.config/google-oauthlib-tool/credentials.json
Run the Sample Code
In the following command:
Replace my-dev-project with the Google Cloud Platform project ID for the Actions Console project you created. To find the project ID in the Actions Console, select the project, click the gear icon, and select Project settings.
Replace my-model with the name of the model you created in the previous step.
(env) $ googlesamples-assistant-pushtotalk --project-id [your own project id] --device-model-id [your own model id]
Test Vedio